

Due to one of my computers dying recently I needed to setup an Arista test lab again on macOS Monterey. Luckily using the setup script provided by Arista does most of the heavy lifting, but a few tweaks are still needed get everything working as expected.
You can basically follow the setup guide provided by Arista, but below I will outline a few changes/issues I encountered:
- The latest version of vEOS that works with the setup script is 4.25. Using any of the later version of vEOS will result in a “Timeout waiting for SSH.” error. I suspect that you could change some vEOS configuration during the setup process to fix the error, but I wasn’t motivated enough to dig further.
- I had a newer version of ‘Packer’ installed using brew (the script provided by Arista uses Packer 1.1.3). This meant I needed to change line 51 of packer-veos/create-veos.py to use a slightly different argument. Instead of
--parallel=falsethe argument needs to be-parallel-builds=1 - Newer version of ‘VirtualBox’ (currently using 6.1) no longer support the
--isoargument. This means that you need to edit packer-veos/virtualbox/vEOS.json and delete all the lines that look like this:
"export_opts" : [ "--iso" ],
After having made the above changes, the setup script should run without error and your Arista lab will be created. However there are still a few more steps required to make the lab easier to use.
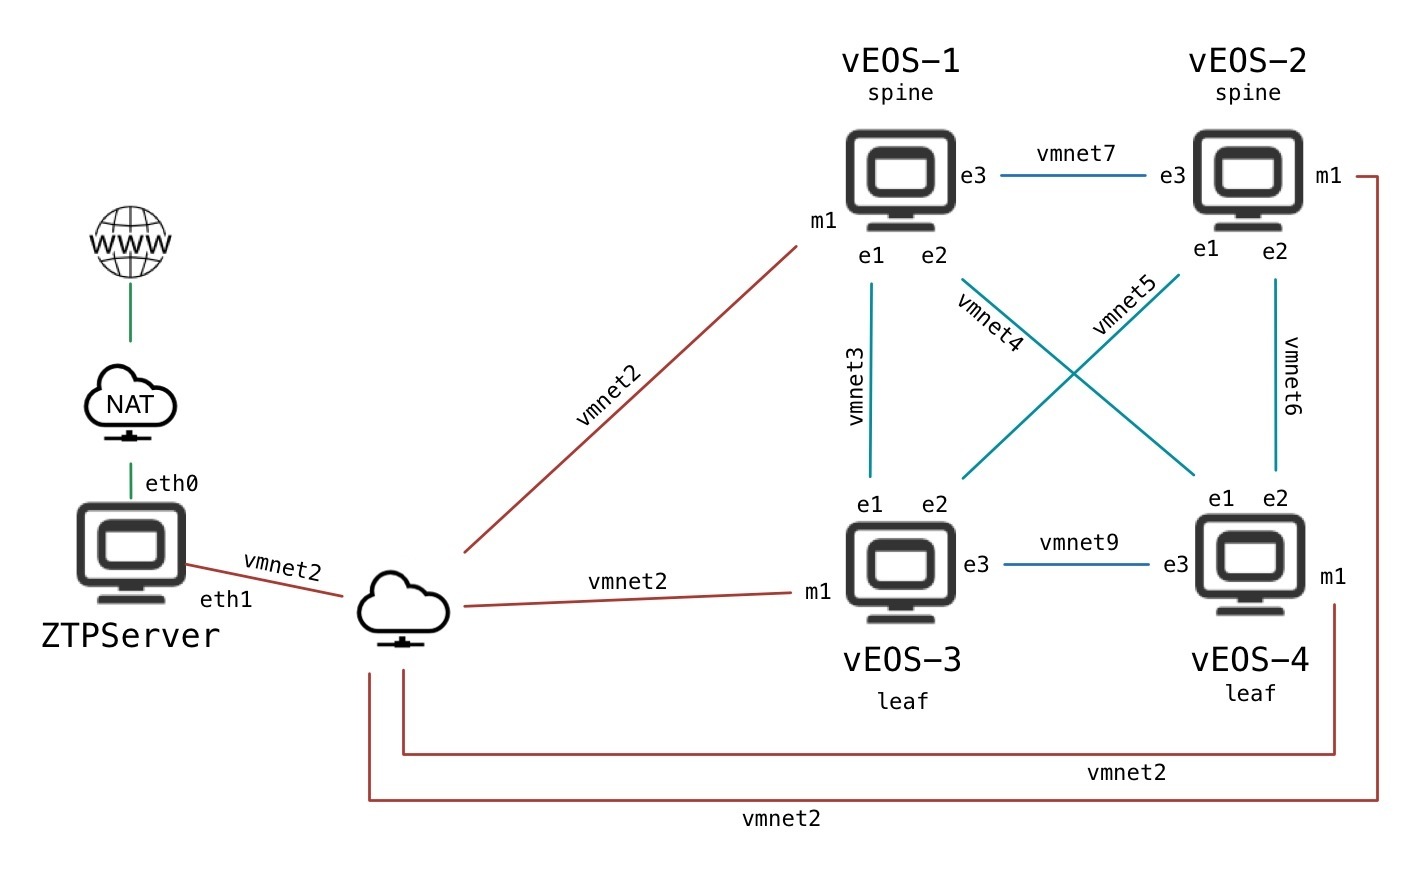
- Configure an IP in each of the Arista nodes created by the setup script. This will allow you to SSH into each of the nodes and access them from the macOS terminal instead of the VirtualBox interface. You can check the network diagram provided by the setup guide to confirm all the network interface names and how they interact, but I will give an example for the node vEOS-1.
In the Mac terminal, first confirm the IP address assigned to the interface vboxnet2:$ ifconfig vboxnet2
vboxnet2: flags=8943 mtu 1500
ether 0a:00:27:00:00:02
inet 192.168.58.1 netmask 0xffffff00 broadcast 192.168.58.255
Then login to vEOS-1 node via VirtualBox and assign an IP to the Management1 interface:> enable
# config t
# int ma1
# ip addr 192.168.58.3/24
# write
You should now be able to SSH into the vEOS-1 node using 192.168.58.3 from the Mac terminal. - I also like to assign a password for the ‘admin’ user and also start the user in ‘enable’ mode so that I can SCP files from my Mac to the Arista nodes.
> enable
# config t
# username admin privilege 15 secret yourpasswordhere
# aaa authorization exec default local
# write - The last step I like to take is to install the Python Client for eAPI (pyeapi). Download pyeapi 0.8.4 to your local Mac. Then SCP the file to the vEOS-1 node:
$ scp pyeapi-0.8.4.tar.gz admin@192.168.58.3:/mnt/flash/
Then login to the vEOS-1 node via SSH and enter the bash prompt:# bash
You can then install pyeapi with the following commands:$ sudo pip install /mnt/flash/pyeapi-0.8.4.tar.gz
You also need to configure the Arista node to install pyeapi each time it boots by adding the following to /mnt/flash/rc.eos :#!/bin/bash
sudo pip install /mnt/flash/pyeapi-0.8.4.tar.gz
Note that some pyeapi setup instructions also state that netaddr has to be installed as a dependency for pyeapi, however netaddr is already installed by default in vEOS v4.25.
Leave a Reply